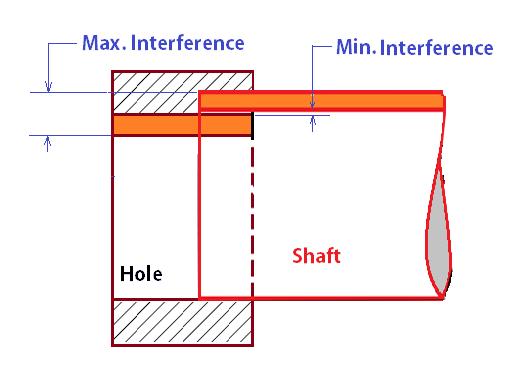
If the tolerance zone of the pin is entirely above of that hole, then the fit obtained is called as interference fit.
Interference Fit Interference fit is defined as the fit established when a negative clearance exists between the sizes of the holes and the shaft. In Interference fit, the minimum permitted diameter of the shaft is larger than the maximum allowable diameter of the hole.
Examples for Interference Fit are: Bearing bushes, small end in the connecting rod.
8) A pin is fitted in a hole. The tolerance zone of the pin is entirely above of that hole. The fit obtained will be
Interference fit

Related Limits and Fits MCQ - Machinist(Set-1) with Answers
Mass production
Interchangeability is normally applied for Mass production.
Interchangeability occurs when one part in an assembly can be substituted for a similar part which has been made to the same drawing.
Suppose there are 100 parts each with a hole, and 100 shafts which have to fit into any of the holes. If there is interchangeability then any one of the 100 shafts should fit into any of the holes and the required kind of fit can be obtained.
Hence, for the interchangeability of holes and shafts, we need a system of limits and fits which gives standard values for the limits on the hole and shaft, so that any particular type of fit can be obtained.
Interchangeability is possible only when certain standards are strictly followed.
In universal interchangeability the mating parts are drawn from any two different manufacturing sources. Universal interchangeability is desirable and to achieve this all standards used by various manufactures should be traceable to a single source which will be an international standard.
When all parts to be assembled are made in the same manufacturing unit,then local standards may be followed which is known as local interchangeability.
The required type of fit in an assembly can be obtained either by universal or full interchangeability or by selective assembly.

On both sides ( upper and lower) of the basic size
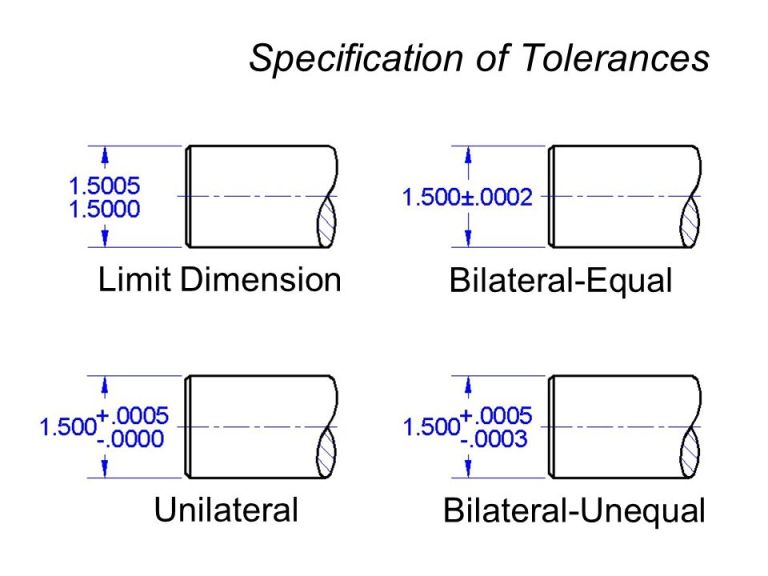
Bilateral tolerance is fixed on both sides of the basic size.
In unilateral tolerance, dimensions of a part is allowed to vary only on one side of basic size, either below or above the basic size.
One example may be given here as 1.5000 +0.0005 /-0.0000. Here the tolerance is 0.0005.
It can be comparable to bi-lateral tolerance method of specifying tolerance. An example for above may be 1.5000+0.0002/-0.0002 mm. Here the tolerance is 0.0004.
In the first case (Unilateral Tolerance), dimension is varying between 1.5005 and 1.5000 whereas in the second case (Bi-lateral Tolerance) dimension is varying between 1.4998 to 1.5002.
Application of unilateral system :
Unilateral system is preferred, especially when precision fits are required , because it is easy and simpler to determine deviations. Further, GO gauge ends can be standardized as the holes of different tolerance grades have the same lower limit and all the shafts have same upper limit.
Further, in unilateral system, this form of tolerance greatly assists the operator, when machining of mating parts. The operator maintain lower limit of holes, knowing fully well that he still has some margin left for machining before the part is is rejected.
Application of bilateral system:
In this system, the dimension of the part is allowed to vary on both sides of basic size , i.e. the limits of tolerance lie on either side of basic size, but may be necessarily equally disposed off.

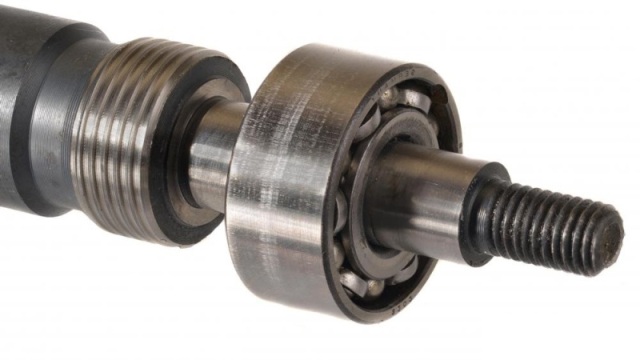
Ball Bearing on the shaft
Driving Fit - When a plug or a shaft is made slightly larger than the hole into which it is to be inserted and the allowance is such that the parts can be assembled by driving, this is known as driving fit.
Ball bearing on the shaft is the best example for driving fit.

Cart rim on the wooden wheel
Best example for shrinkage fit is Cart rim on the wooden wheel.
Shrinkage fit A shrinkage fit is obtained by making the shaft (internal member) slightly larger than the hole (external member). In shrinkage fit, pressure is not required for assembling but instead the hole (external member) is heated and expanded sufficiently to permit the shaft (internal member) to be inserted easily. Then the hole (external member) is cooled to shrink tightly around the shaft (internal member).
