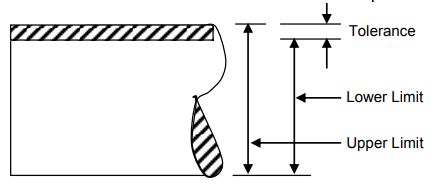
Tolerance is defined as the difference between the maximum and the minimum sizes allowed in manufactured components.
171) The difference between the upper limit and lower limit of a dimension is called
tolerance

Related Workshop Technology MCQ with Answers
upper deviation
Algebraic difference between a size and a corresponding basic size is called deviation. Limit deviations are upper and lower deviations. Algebraic difference of actual size with basic size is called actual deviation.
Upper Deviation: It is the algebraic difference between the maximum size and the basic size.
The upper deviation of a hole is represented by a symbol ES (Ecart Superior) and of a shaft, it is represented by es.
Lower Deviation: It is the algebraic difference between the minimum size and the basic size.
The lower deviation of a hole is represented by a symbol EI (Ecart Inferior) and of a shaft, it is represented by ei.
lower deviation
Algebraic difference between a size and a corresponding basic size is called deviation. Limit deviations are upper and lower deviations. Algebraic difference of actual size with basic size is called actual deviation.
Upper Deviation: It is the algebraic difference between the maximum size and the basic size.
The upper deviation of a hole is represented by a symbol ES (Ecart Superior) and of a shaft, it is represented by es.
Lower Deviation: It is the algebraic difference between the minimum size and the basic size.
The lower deviation of a hole is represented by a symbol EI (Ecart Inferior) and of a shaft, it is represented by ei.
one side of the nominal size
In a unilateral system of tolerance, the tolerance is allowed on One side of the nominal size. Unilateral Tolerance is concerned with variations in single direction whether plus or minus.
both sides of the nominal size
Bilateral tolerance is fixed on both sides of the basic size.
In unilateral tolerance, dimensions of a part is allowed to vary only on one side of basic size, either below or above the basic size.
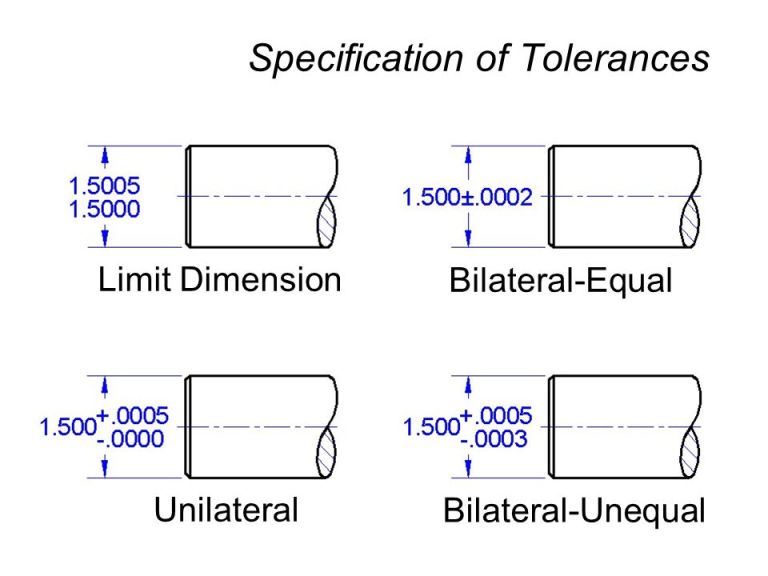
One example may be given here as 1.5000 +0.0005 /-0.0000. Here the tolerance is 0.0005.
It can be comparable to bi-lateral tolerance method of specifying tolerance. An example for above may be 1.5000+0.0002/-0.0002 mm. Here the tolerance is 0.0004.
In the first case (Unilateral Tolerance), dimension is varying between 1.5005 and 1.5000 whereas in the second case (Bi-lateral Tolerance) dimension is varying between 1.4998 to 1.5002.
Application of unilateral system :
Unilateral system is preferred, especially when precision fits are required , because it is easy and simpler to determine deviations. Further, GO gauge ends can be standardized as the holes of different tolerance grades have the same lower limit and all the shafts have same upper limit.
Further, in unilateral system, this form of tolerance greatly assists the operator, when machining of mating parts. The operator maintain lower limit of holes, knowing fully well that he still has some margin left for machining before the part is is rejected.
Application of bilateral system:
In this system, the dimension of the part is allowed to vary on both sides of basic size , i.e. the limits of tolerance lie on either side of basic size, but may be necessarily equally disposed off.
